
1
Shoot the Dancer – Photography and Dancesport:
Group Shots.
Text: Helmut Römhild Photography: Helmut Römhild
| • | When documenting the presentation ceremony. |
| • | The official portrait of the dancers competing for a club (press release, advertising, hall-of-fame shots). |
The good news for the photographer: Group shots are static, there is no movement to cope with.
The bad news: there are some very challenging issues to consider.
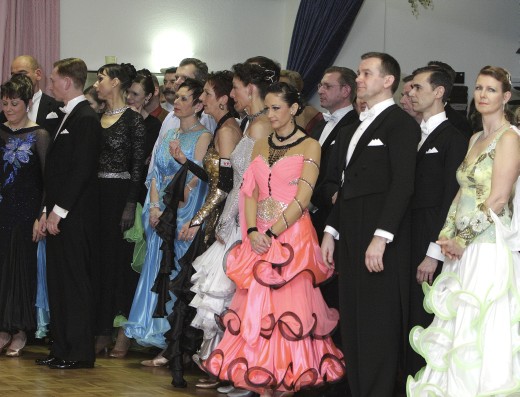
To organise such a group shot is very often the main challenge: Ever tried to manage a hall of fame shot? It seems to be impossible to bring all the dancers together in one spot at a certain time.
Once the dancers are lined up for the camera, the photographer has to solve the technical issues: to fit the group into the picture and to light the group.
Fit the group: The basic exercise when taking group pictures.
To fit a group into the picture means to find the ideal distance to shoot, so that every person is seen by the camera and appears in the picture.
the angle of view is determined by the frame size of the film material or the camera chip and the focal length
of the lens.
Here’s an example:
7 pairs lined up are an object about 7 meters wide.
For a frontal shot of the group with a 28mm lens on an APS chip camera you need to step back almost 9 meters to catch the 7 pairs.
That means the people will be rather small:
If a standing person occupies roughly 1,80 meters the 7 pairs fill less than half of the available space in the picture.
Your picture taken from 9 meters distance will show a small row of people and you will have to look hard to see anything interesting.
the persons filling most of the frame.
A larger group would mean that you have to step back even further, the people becoming smaller:
| • | 3 pairs cover about 3 meters and will fit into the frame at 3,74 meters distance. |
| • | 18 pairs who cover 18 meters need a distance of 22,40 meters. Your picture will show a row of tiny creatures, impossible to identify. |
Light the group: long distances and the inverse square law.
Your challenge are the long distances, your adversary is the inverse square law.
The inverse square law tells you that the longer the distance, the weaker the light becomes which is reflected back into your
camera - and that it becomes weaker at an amazing rate.
And what is more: you need a flash beam that spreads wide enough to light the group from end to end.
If you use direct flash your flash beam has to spread at an angle of 44 degree at least.
For a Nikon SB 27 flash this is reflector zoom ‘50mm’ which creates a flash intensity of guide number 42.
You can catch the reflected light with roughly f/4.4.
If you bounce the flash against a ceiling 7 meters high with guide number 50 you get a more than 7 meters wide flash beam
at a 45 degree angle if you are 9 meters from the group.
The f/stop to catch the reflected light would be roughly f/2.6.
Photography and Dancesport.
Cameras pointed at dancers, flashes going off: a common thing accompanying even the smallest dancesport event.
Taking pictures of dancers is driven by several motivations:
taking souvenir shots,
documenting the performance for later analysis,
reporting on the event for press releases and club websites.
But everyone pointing a camera has one thing in common: everyone wants the best quality acchievable – simply because each event is unique,
never to be repeated.
In a series of articles ‘Ballroom’ will discuss selected issues of dancesport photography.
Your strategy: Shrink the group!
But how to get closer and still fit the group into the frame?
Easy: The group needs to be smaller – shrink it.
Here are some approaches to make the group smaller so you can get closer.
You can move to the left or right of the lineup and shoot from an angle.
The group is now 'tilted' which makes it optically smaller:
it fits into a much smaller field of vision.
And now you can move closer to the group.
7 pairs covering about 7 meters but taken from an angle instead from the front allow a much better setup:
while the distance to the farthest person is still 9,23 meters, the distance to the nearest person is 3,70 meters.
More persons will be close to the camera and the picture full of details.
The issue now is the depth of field (DoF) between far end and near end: how many people will be in focus and appear ‘sharp’?
Even with optimised camera settings the farthest pair plus 1 person next to them will be slightly blurred.
Either live with blurred foreground/background or use small apertures.
Unfortunately small apertures inevitably lead to a lighting issue.
A point-and-shoot digicam has an advantage here because of the enormous depth of field it creates with the
minimal focal length of the built in lens.
You acchieve the same ‘tilting’ effect by standing on a ladder with the group
broken into 3 or 4 rows, one behind the other.
This setup too makes the group optically smaller and is ideal for large groups.
A panorama shot is also known as ‘stitch’: If a scene doesn’t fit in 1 picture (e.g. a landscape) shoot it in portions
and afterwards join the series of partial shots!
Use this option for groups: go as close as you need to make persons fill the frame. Take your picture, then
move sideways (keeping the same distance) and shoot the next persons, move sideways again etc.
Use panaroma software to align and stitch the pictures. Even mobile phones can do that!
This is a perfect strategie for hall-of-fame shots.
Shoot each pair seperately then go to your computer and cut away the background from each picture.
Bring all pairs together digitally by composing a new picture!
Software like Photoshop™ or The Gimp can do the job. The group shot will be a composite picture or photomontage.
There are several advantages:
| • | You don’t shoot a group but 2 people. No issue with fitting them into a picture. |
| • | Easy to organise. Instead of trying to bring together all the pairs you shoot them one by one whenever they are ready and wherever they are available. |
| • | The picture is easier to update! It is simpler to delete, replace, and add a pair than to organise a new session for all pairs together. |
![]()

©: Ballroom Website, 2010
Updated: 25.10.2010