
1
Shoot the Dancer – Photography and Dancesport:
Bouncing The Flash.
Text: Helmut Römhild Photography and Diagrams: Helmut Römhild
The main target of the dancesport photographer is the pair of dancers performing in a tournament.
But light conditions on the dancing floor usually range from poor to desperate and force the photographer to bring her or his own light – the flash.
Bouncing the flash means to reflect the flash beam from the ceiling instead of aiming it directly at a person.
A wall or even a white t-shirt is also a good reflector but the ceiling is widely used because it is free from obstructions.
The pictures taken with bouncing look definitely better – so much better that bouncing is recommended and practiced as if it were a foolproof
way to great shots.
What happens when a flash is bounced?
The beam is reflected from the ceiling at the same angle as it is aimed at the ceiling. Pointing the flash at the ceiling means to tilt the flash head upwards at a certain angle, the tilt angle.
Firing the flash means that the light spreads out from the flash head forming the beam angle.
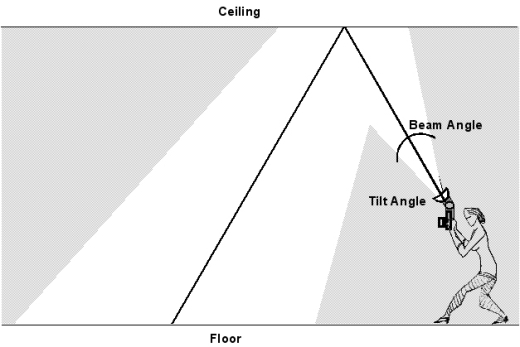
Where the beam hits the floor is determinated by the hight of the ceiling and the tilt angle of the flash:
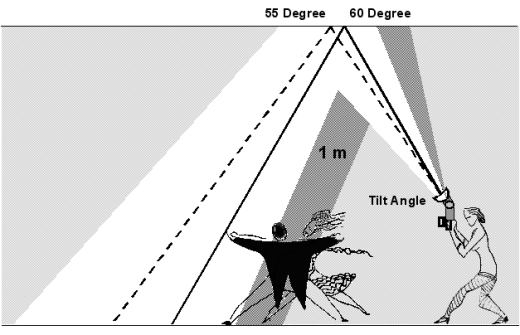
| • | Ceiling hight 5 meters, tilt angle 60 degree. A 23 degree beam hits the floor about 3,30 meters from the camera. |
| • | ceiling hight 7 meters: the beam is now illuminating the floor 4,70 meters away. |
| • | Ceiling hight 5 meters, tilt angle 55 degree: now the light starts 4,30 meters away. |
Tilt ! Find and keep the correct tilt angle.
Whether the flash is tilted 60 or 55 degrees moves the light beam and makes a difference of 1 meter!
This can easily mean the difference between lighting the dancers or not.
If the flash sits on top of the camera a 5 degree error occurs already when the photorapher
readjusts the camera angle to get a better frame.
And who knows how high the ceiling really is?
Can you really see the difference between 5 and 7 meters?
I think that many bounced shots never really get the subject.
Instead the person is directly illuminated by a spill from the flash.
A flash spill is light that ’spills‘ over the edges of the flash reflector and expands horizontally even from a tilted flash head.
It can be very powerful and very irritating.
Experienced photographers tend to block any spill by using devices called black flag or gobo.
These are screens attached to the flash protecting the subject from flash spill.
Photography and Dancesport.
Cameras pointed at dancers, flashes going off: a common thing accompanying even the smallest dancesport event.
Taking pictures of dancers is driven by several motivations:
taking souvenir shots,
documenting the performance for later analysis,
reporting on the event for press releases and club websites.
But everyone pointing a camera has one thing in common: everyone wants the best quality acchievable – simply because each event is unique,
never to be repeated.
In a series of articles ‘Ballroom’ will discuss selected issues of dancesport photography.
Now – what exactly is illuminated?
The beam coming down from the ceiling illuminates a certain area.
Ceiling hight and the flash's beam angle mainly determin the size of illuminated area.
The beam angle is related to the flash’s reflector focus.
E.g. a Nikon SB 26 can be focussed at steps called 85, 70, 50, 35 , 28 and 24 mm.
85 mm creates a very tight beam while 24mm spreads the beam wide.
A wide beam angle will also produce a large illuminated area – unfortunately it goes together with a very low light intensity.
Especially when bouncing we want as much light as possible and we will therefore select the tightest beam possible.
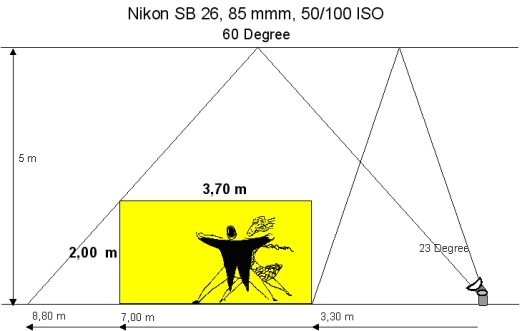
A Nikon SB 26 setup can be as follows:
| • | reflector focus at 85 mm |
| • | flash pointed at a ceiling which is 5 meters away |
| • | flash head tilted at an angle of 60 degree. |
Assuming that a standing person needs 2 meters headroom only an area
of barely 4 meters deep and 5,50 m wide remains in which the light illuminates the whole body.
Of the illuminated area only this portion is useful: the light zone.
The dark end: the fall off issue and what it means in practice.
The light conditions inside the light zone are determined by the power of the flash and the inverse square law which describes the intensity of reflected light.
In fact the intensity of the light reflected from the subject deteriorates at a horrifying rate with increasing distance to the camera.
Depending on where the dancers are in the light zone the conditions can vary and different portions of the body
are illuminated well or poorly because the fall off creates diagonal ‘layers’ of intensity.
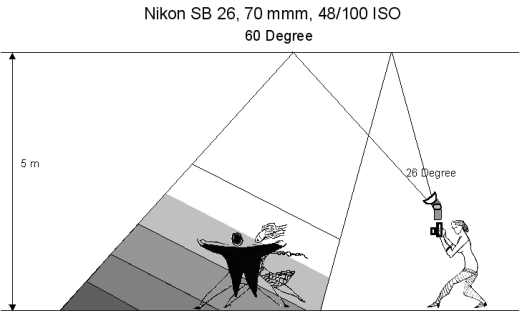
Of course the fall off is gradual and doesn’t happen in steps as in the example here which just outlines the basics:
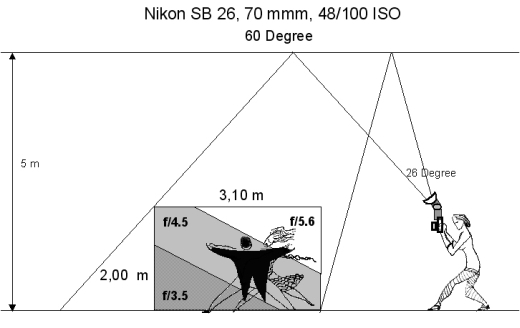
A Nikon sb 26 is set to 70mm focus and at full power. It provides an intensity of guide number 48.
A standing photographer using an on-camera flash may fire the flash about 2 meters above the floor with tilt of 60 degree.
We would now be able to calculate the aperture with which the photographer can catch the reflected light – but ...
But no ceiling is a perfect reflector and in fact absorbs more light that it gives back which is also true
for the subject’s clothes and skin.
Photographers tend to simulate the effects of absorption and diffusion by using apertures which are 2 stops larger than calculated thus allowing more light to enter the lens.
This leaves us with f/5.6 in front of the light zone and f/3.5 in the back as the following diagram shows (for a 50 mm 1.4 Canon Lens):
Dancers and demons: the issue of light from above.
The bounced beam creates a light source which is large and quite ’soft‘ but still directional, hitting the subject at a rather steep angle.
Only surfaces with a more horizontal than vertical tilt will reflect the light into the camera – the rest will
remain dark.
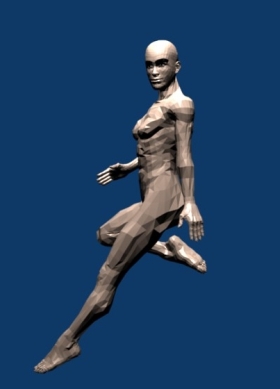
What that means is demonstrated with a 3-D simulation of a bounced flash beam which shows the lighted portions of the body and face.
The effect of deep eye shadows and dark patches under the cheekbones is rather dramatic if not demonic and clearly shows that the bounced flash alone is not sufficient.
Additional light is needed to fill the unlighted portions of the subject to create an attractive illumination.
The bottom line.
| • |
Seperate the flash from the camera. This is the only way to preserve the tilt angle, precondition for a stable position of the light zone. At the same time the camera remains free to be moved creatively. Use a chair or a short tripod to place the flash close to the floor: a longer flash beam creates a larger light zone. |
| • | The flash alone is not enough: there needs to be sufficient additional light to illuminate the areas of the subject which the bounced beam cannot reach and avoid the ’demonic‘ look. |
| • |
The bounce setup should provide a light zone approximately 3,70 deep with 2 meters headroom, starting at about 3,30 meters
from the camera and ending at a distance of 7 meters. The reason: such a light zone covers the DoF created by a 28 mm lens (described in an earlier article.) Such a DoF combined with a matching light zone allows to keep moving dancers in focus and illuminate them sufficiently. |
| • |
Test the setup by taking pictures of a person inside the light zone. Remember that the back of the light zone is darker and that the upper parts of the subjects always get most of the light. Find the correct camera settings for back and front of the light zone. |
| • |
Know your distance. Find the setup either by trial and error (test shots) or by using the old and trusty laser or ultrasonic meter to get the ceiling height. Well: if you go by numbers you will also have to make a few calculations to approximate tilt angle and flash beam angle. |
Here is a model setup with aperture values for a 50 mm 1.4 Canon Lens and some example bounce setup data which create light zones more or less covering the DoF requirements (all distances in meters).
Note that with a ceiling hight of 7 meters a Nikon flash would be too weak and a Metz ’Flashgun‘ at guide number 70 is used.


![]()

©: Ballroom Website, 2010
Aktualisiert: 31.08.2010